As part of my job as Assistant Coordinator to the Kutztown University Program on Visual Impairment, I do recruitment/information presentations to current KU classes, local high schools, community colleges, and organizations. These presentations are designed to not only spread the word about our AWESOME TVI program at Kutztown University, but also help to teach others about blindness, visual impairment, and the great tools and adaptations our students use to access their curriculum.
After doing these types of presentations for a few years, I used Adobe Express to make 8.5 x 11 posters of the different stations I typically set up. Doing this allows me to stay more organized when planning and packing materials, but also helps the participants understand and independently interact with the different materials. Every presentation varies slightly and will depend on the age and number of participants, as well as how much time I am given to present.
The Presentation
I will first give a brief presentation about visual impairments, what a Teacher of the Visually Impaired is and the Kutztown University Program on Visual Impairment. This is the most up to date Google Slides/PowerPoint Presentation I have made. Kutztown University Vision Program
This is the original template I used for the slides background and icons. Template. You can find lots of free slides templates here at slidesgo.com
The Station
Next, I will break the group up into groups and assign them different stations. I try to use a visual countdown timer and display that on the board to make sure everyone has time to get to each station. This website has a great list of free ones to try!
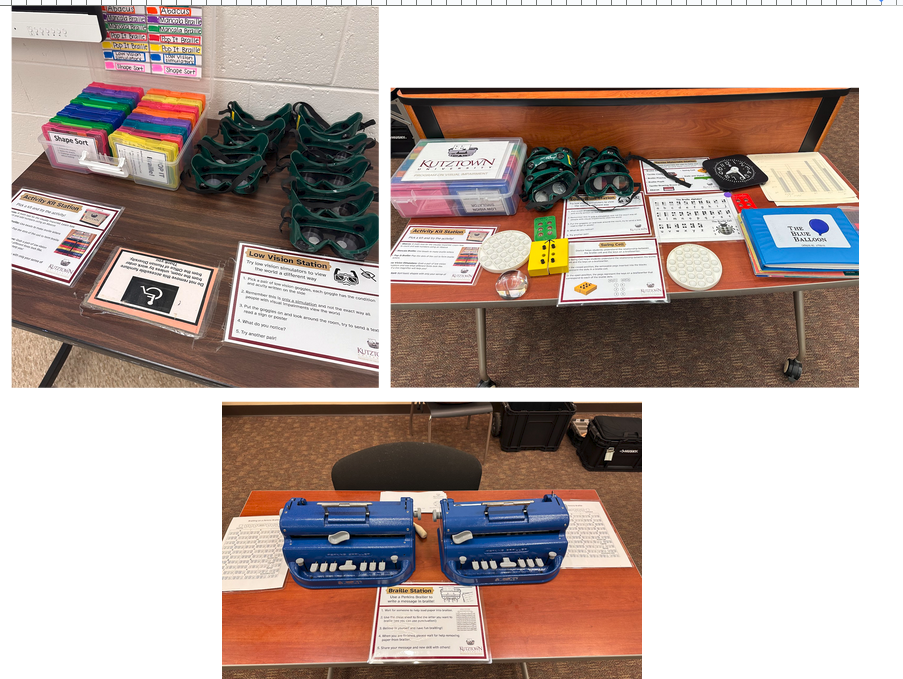
I have 8 designated stations that I will choose from depending on the group and amount of time I have. Sometimes I will combine stations or have them in the same area to save space. The different stations I have made are:
- Braille Station
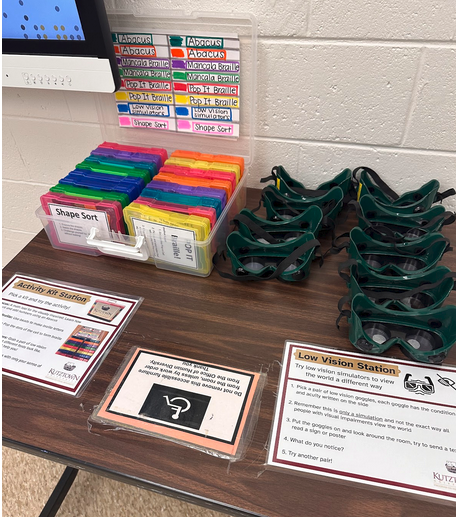
- Low Vision Station
- Activity Kit Station
- Abacus Station
- Draftsman Tactile Drawing Board Station
- Slate and Stylus Station
- Swing Cell Station
- Tactile Materials Station
Braille Station
Use a Perkins Brailler to write a message in braille!
- Wait for someone to help load paper into brailler.
- Use the cheat sheet to find the letter you want to braille (yes you can use punctuation!)
- Believe in yourself and have fun brailling!!
- When you are finished, please wait for help removing paper from brailler.
- Share your message and new skill with others!
Materials Needed
- Braillers
- Braille Paper
- I print this document, Braille Paper Template, and then copy it onto braille paper and cut it, so students can use these to put in the Brailler and take with them. (Really has helped to cut down on wasted braille paper)
- Brailling Cheat Sheet
- How to Load Paper into a Perkins Brailler
Low Vision Station
Try low vision simulators to view the world a different way
- Pick a pair of low vision goggles, each goggle has the condition and acuity written on the side
- Remember this is only a simulation and not the exact way all people with visual impairments view the world
- Put the goggles on and look around the room, try to send a text, read a sign or poster
- What do you notice?
- Try another pair!
Activity Kit Station
Pick a kit and try the activity!
- Abacus: A math tool for the visually impaired. Learn how to count and add numbers using an Abacus
- Mancala Braille: Use beads to make braille letters
- Pop It Braille: Pop the dots of the cell to form braille letters
- Low Vision Simulators: Grab a pair of low vision simulators and see what different fonts look like. See if a line magnifier will help you!
- Shape Sort: Sort basic shapes with only your sense of touch!
Tactile Materials Station
Explore materials we use to help our students access their curriculum
- Braille Books
- Tactile Clock
- Braille Playing Cards
- Braille PopIt
- Swing Cell
- Slate and Stylus
- Tactile Drawing Board (Draftsman)
- Abacus
Draftsman Tactile Drawing Board
This versatile tactile drawing board is used in combination with special film and a stylus to create instant raised-line drawings.
Use the stylus to draw something and then feel your work!
The Draftsman Tactile Drawing Board is the perfect tool for:
- Producing simple raised-line graphics
- Demonstrating math concepts and tasks
- Demonstrating science concepts
- Practicing handwriting skills
- Playing games, such as tic-tac-toe, etc.
- Facilitating tracing activities
- Creating art drawings
Simply clamp a sheet of drawing film onto the board, and you’re ready to use the stylus or a ballpoint pen to create the perfect raised image!
Swing Cell
A Swing Cell device helps students understand the relationship between the braille cell and the keys on a braillewriter.
In the closed position, the removable pegs inserted into the blocks represent the dots in a braille cell.
In the open position, the pegs represent the keys on a braillewriter that correspond to each of the braille dots.
Slate and Stylus
The slate and stylus is designed to punch (emboss) raised, tactile bumps or dots onto a page. A stylus is a pointed tool that is used to press on the slate and make the indentations for the braille. When using the slate and stylus an individual writes from right to left. So, each braille letter is written “backwards”. This tool can be used for quick notes, grocery lists and more!
Abacus
An abacus is a math tool used for people who are blind or visually impaired.
Numbers are “set” when they are recorded and “cleared” when they are removed or erased.
This tool can be used for counting, place value, 1:1 correspondence, addition, subtraction, multiplication, division, and even fractions and decimals.
Summary
Since I have created and used these station cards, I have noticed an increase in participation and ease of organization when completing these presentations. This system not only helps myself as the presenter, but also helps participants have clear expectations and guidance when interacting with such unfamiliar tools and equipment.
Find most of these great materials at American Printing House for the Blind.
BONUS
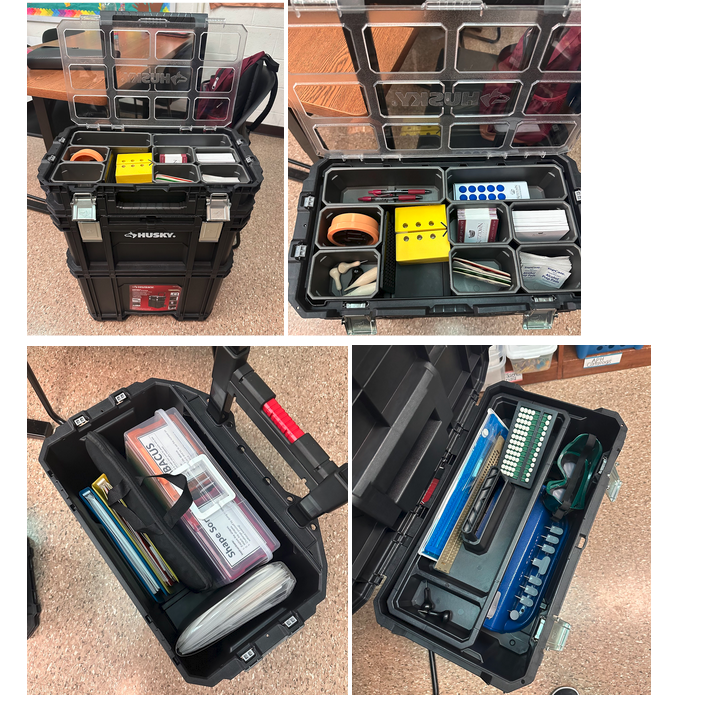
This awesome $100.00 Husky Connect Rolling System Plastic Tool Box from Home Depot fits almost ALL of the supplies needed for these presentations. It can even fit 2 Perkins Braillers!!
Extra Bonus
I also made this booklet, Learn About Braille, which I pass out whenever I do these presentations. I created this as a beginner introduction to braille that allows participants to learn and explore the braille code at their own pace. It also has information about our Visual Impairment Program at Kutztown University!
